What is the Zettle card reader and its accessories?
- Connects to your device via low energy bluetooth.
- Accepts chip and PIN, contactless payments, and mobile payments including Apple Pay, Google Pay and Samsung Pay.
- For chip and PIN payments and contactless payments above a certain amount, payments are approved with the customer’s PIN.
- Charges via USB cable (approximately 1‒2 hours). Compatible with the Dock 2.
- Up to 8 hours of battery life (100 payments).
- You can buy a card reader at https://shop.zettle.com/gb.
The PayPal reader:
- Connects to your device via BT 5.1 or wired connection.
- Accepts the same payment methods as the Zettle reader.
- Has improved touch screen for tipping functionality.
- Charges with the provided USC-C power adapter.
Connecting your reader
To connect the Zettle reader, open the Zettle POS app and go to Settings, then Card readers and follow the instructions.
To connect the PayPal reader, scan the QR in the display of the reader and follow the instructions.
Compatible smartphones and tablets
The card reader can be used with a variety of iOS and Android devices. You’ll need to connect your card reader and device via bluetooth first.
Important notice about use
Zettle POS supplies the card reader device for use by you or your business, as applicable, and you agree not to use the product for any resale purposes. Do not use the product for any purpose other than effecting payment transactions through your installed version of the Zettle POS mobile software application. You may not modify the software or the hardware of the product in any way, save to the extent permitted by mandatory law.
Handling and caring for your reader
Keep the card reader in a cool, dry place (ideally, 22° C). Use a soft, damp cloth to clean the device’s exterior. Don’t spray any type of liquid directly onto the device and avoid exposure of any of its openings to moisture. Don’t use solvents. Ensure that nothing enters your card reader through any openings, such as the card slots. Avoid causing shock or negligent handling of your card reader.
Accessories
We support various receipt printers, cash drawers and barcode scanners that you can use when accepting payments with Zettle POS.
The Reader 2 uses bluetooth to pair to your smartphone or tablet, and the Terminal connects directly to your WiFi network, or via 3G/4G (depending on network availability and connectivity) with its pre-installed SIM.
Many compatible accessories can connect to your Zettle POS hardware in different ways, including WiFi, bluetooth, USB or Apple Lightning connections. If you’d like to add wireless accessories to your setup, keep in mind that they’ll need to use the same network as your Zettle POS hardware.
Multiple smartphones, tablets and Terminals can be connected to a supported receipt printer that is using the same network. You can also connect the printer to a compatible cash drawer.
Docking stations
We offer docking stations that charge your Reader or Terminal and present a customer-friendly checkout experience.
Receipt printers
We have stationary and portable printers. You can also print receipts using any printer with support for AirPrint if you have an iPhone or iPad.
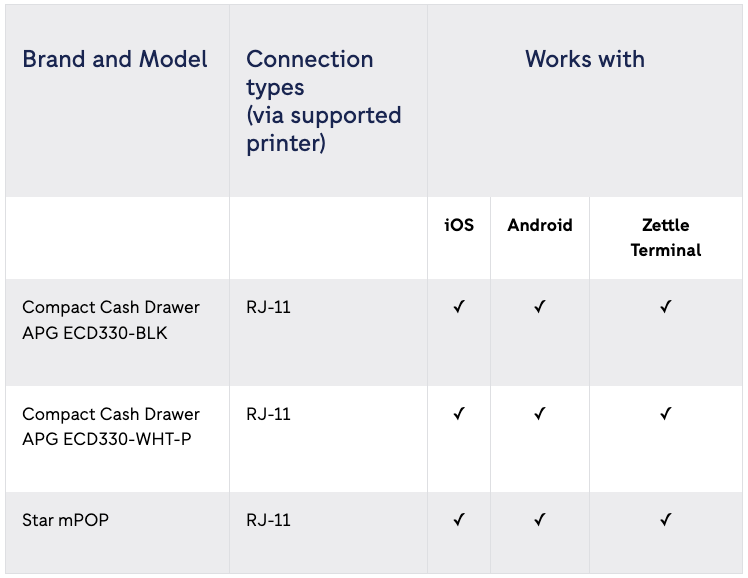
Cash drawers
You can connect a cash drawer to your printer if you have one of the stationary printers in the list above.

Barcode scanners
Barcodes are unique identifiers for each product; they’re often called UPC or EAN codes. You can connect a barcode scanner directly to your smartphone or tablet, or you can scan codes using your device’s built-in camera together with the Zettle POS app.
Scanning barcodes within your POS app (after you’ve added the UPC/EAN to your product’s details) allows you to quickly ring up items without having to scroll through your product library.
You can help speed up sales and daily tasks by scanning barcodes using your smartphone or tablet’s rear-facing camera together with the Zettle pos app. The app’s barcode scanner can help you quickly to:
- add new products to your library
- manage your product inventory
- ring up items without having to scroll through your product library
The barcode scanner can read both UPC/EAN and QR codes.
Here’s how to add a new product to your library using the barcode scanner:
- Go to your product library and view the library in list view. You’ll see the barcode scanner icon at the top of the page.
- Tap the barcode scanner icon.
- Once the barcode scanner window pops up, focus your camera on the product, making sure that the product barcode is in the frame.
- Your camera will automatically scan the barcode, and you can tap OK to create a new product.
Here’s how to use the barcode scanner to register barcodes for existing products:
- Go to your product library, tap Edit (iOS) or the pen icon (Android) and select the product you want to edit.
- Tap the barcode scanner icon next to the barcode field.
- Once the barcode scanner window pops up, focus your camera on the product, making sure the product’s barcode is in the frame.
- Your camera will automatically scan the barcode.
- Once the barcode has been scanned, its information will automatically be added to your product’s details.
Here’s how to sell a product using the barcode scanner:
- Go to your product library and view the library in list view. You’ll see the barcode scanner icon at the top of the page.
- Tap the barcode scanner icon.
- Once the barcode scanner window pops up, focus your camera on the product, making sure that the product barcode is in the frame.
- Your camera will automatically scan the barcode and add the product to your shopping cart.